In some ways, large format is the easiest branch of photography to learn. After all, the camera only has a shutter button and an adjustable aperture ring. Simply compose, focus, and click...that's all there is to it! I'm only saying that somewhat tongue in cheek. You can of course start to get more complex with camera movements, but large format is really photography in it's most basic terms. Select a film, aperture, and shutter speed and fire away. How do you get the correct shutter speed though? That's where metering technique comes in.
I learned to meter by reading Ansel Adams' book The Negative. (In a way, I guess I can say Ansel Adams taught me photography. There are worse people to learn from...) If you are even remotely familiar with film, you've probably heard of Adams and The Zone System. The Zone System was his creation as a way to produce consistent prints by controlling both the exposure and the development.
I can remember, long before I started shooting film, coming across some film photographs online where the photographer would be talking about zones and using Roman Numerals. At that time, this might as well have been a foreign language to me. I had only heard of the Zone System in passing, and I was sure that it was overly complex. I could not have been more wrong.
Black and White Film
Using the Zone System is almost laughably easy once you get the basics down. In its purest form, the Zone System deals only with black and white photography. It can be adapted for use in color film, but let's take a look at monochrome images to begin with. If you were to create a gradient in Photoshop that smoothly transitioned from pitch black to pure white, and then divided that gradient evenly into 11 segments, you would have the foundation of the Zone System.
View fullsize
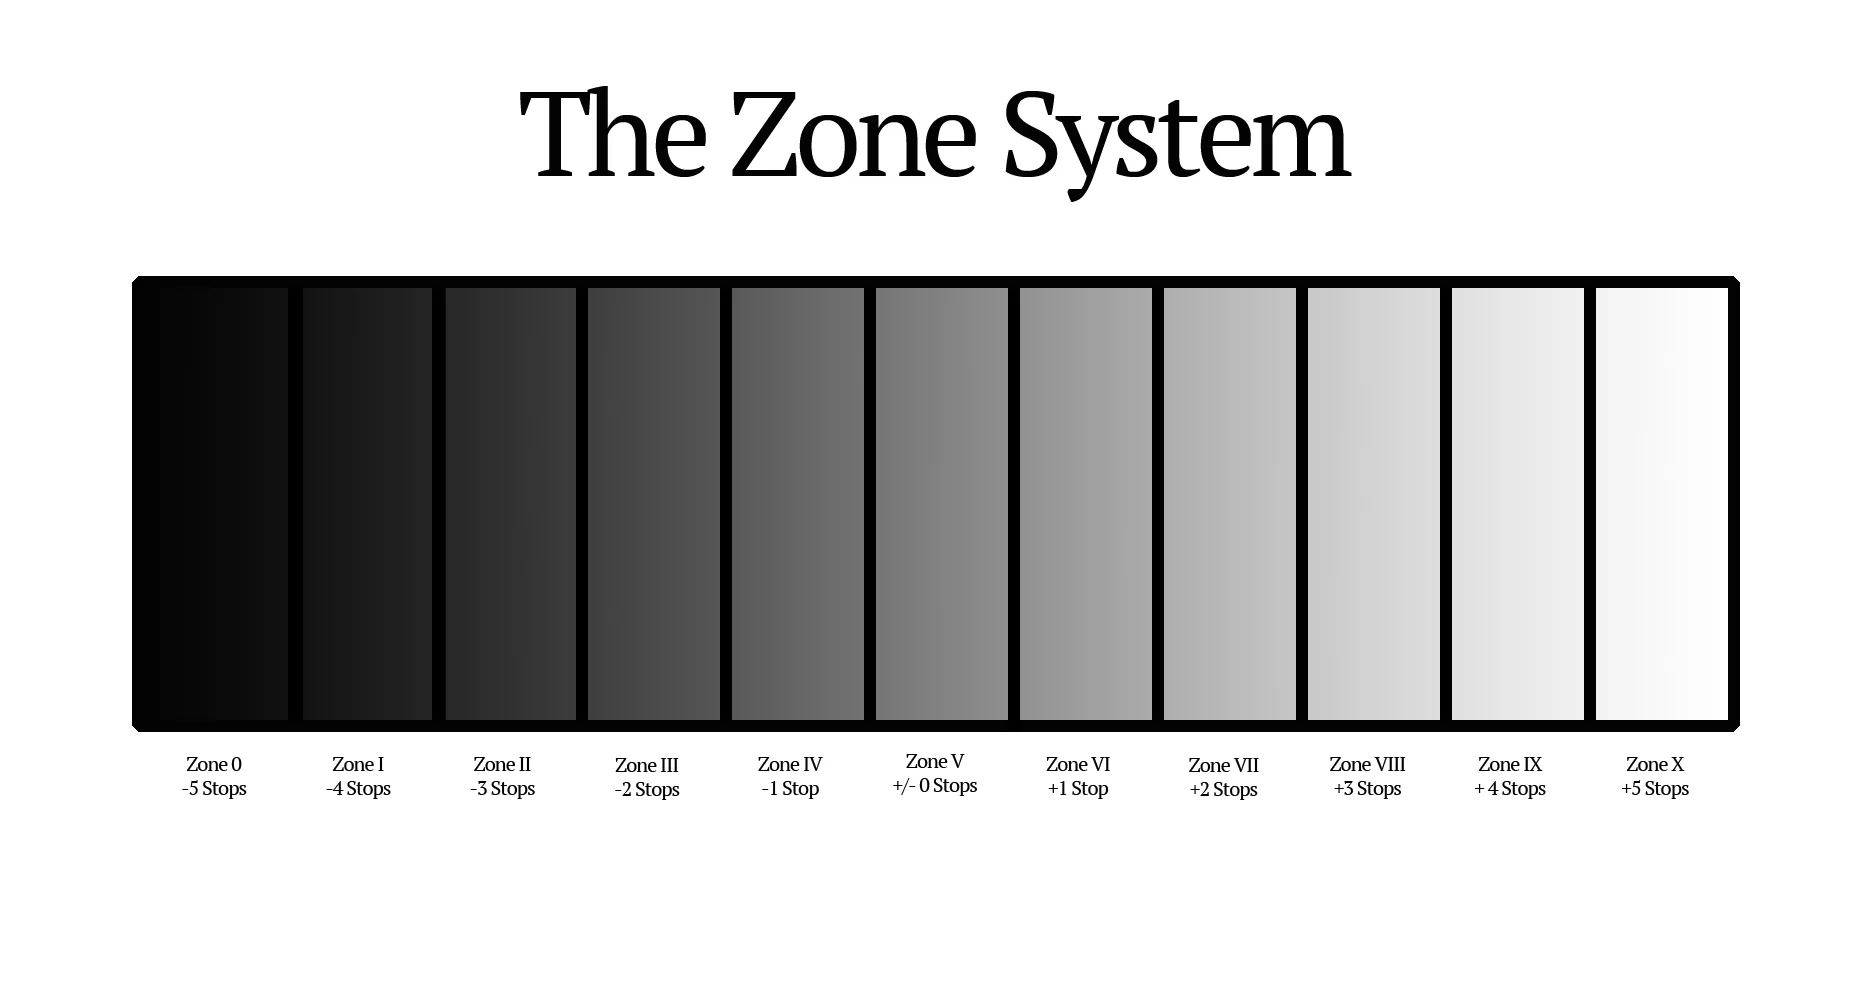
The Zone System in all of its glory.
Using Roman Numerals (because they're just cooler) Zone 0 represents pitch black, Zone X is pure white, and Zone V is middle gray. There is a difference of one stop of light between each zone. Zone VII is two stops brighter than Zone V; Zone IV is one stop darker than Zone V. You do remember your Roman Numerals from elementary school and previous Super Bowls, right?
To take full advantage of the Zone System, you MUST use a light meter with a spot meter function. In my case I use a Sekonic L-558 in aperture priority; I set the aperture I'm using and the meter gives me a shutter speed. (I've seen videos on YouTube of people using an incident meter and the Zone System. Don't even bother with it; it's overly complex and convoluted. It's like they are purposefully trying to make their life more difficult...) It is VERY important to realize that the spot meter is calibrated to give you a reading for middle gray, Zone V. No matter what you aim at, the meter will spit out a shutter speed that will make the subject middle gray (grey for those outside the U.S.) Here's an example. If you took a meter reading off of a white sheet of paper and then exposed for that reading, the paper will appear gray. Similarly, if you took a meter reading off of a black sheet of paper and then exposed for that reading, the paper will again appear gray.
Armed with the knowledge of how light meters work and the fact that there is one stop of light between each Zone, we can start using the Zone System now. However, before we get started, lets take a look some common objects in each zone. This will give you a reference point when you start metering.
- Zone 0-Completely black
- Zone I-Nearly black. There is some slight tonality, but no texture.
- Zone II-Some slight texture in the black areas of the image.
- Zone III-Darkest part of the image that shows adequate texture. This is a very important zone.
- Zone IV-Dark foliage, dark stone, dark shadows in daylight sun.
- Zone V-Middle gray. Dark skin. Gray stone.
- Zone VI-Average Caucasian skin. Shadows on snow on a sunlit day.
- Zone VII-Light skin. Snow being side lit.
- Zone VIII-The lightest zone that retains adequate texture. Another very important zone.
- Zone IX-White, but with no texture.
- Zone X-Pure white. When printed will only show the paper base.
View fullsize
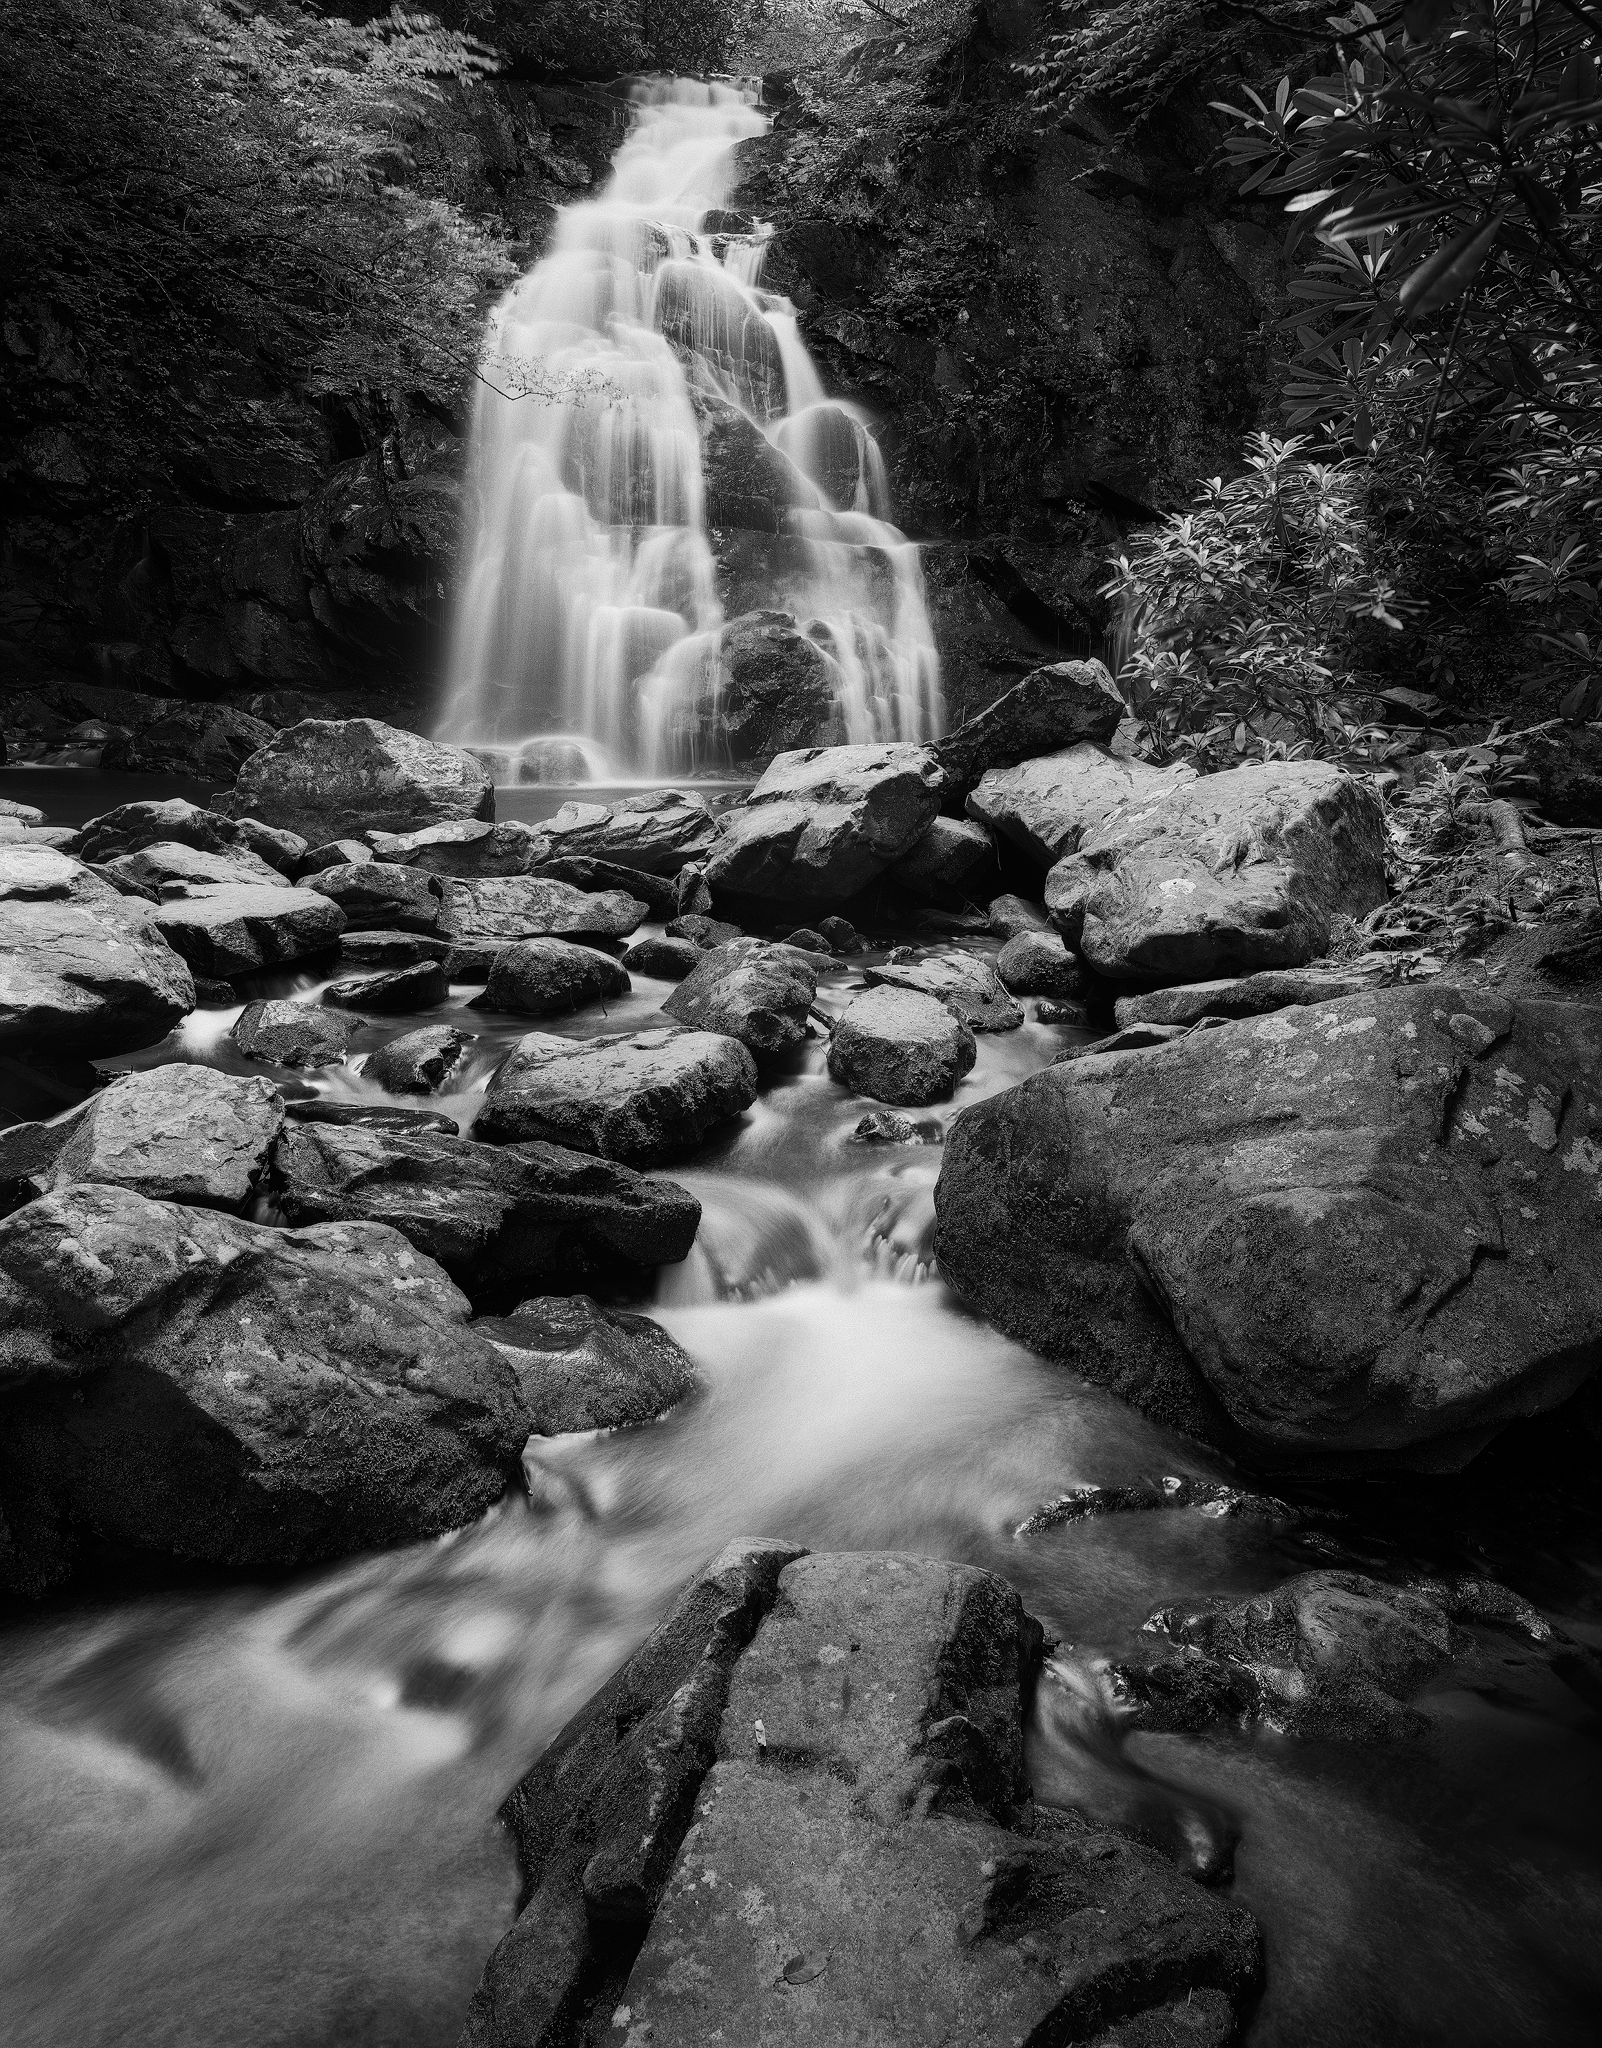
Spruce Flats Falls in some especially good light.
So now that we've got the foundation and the knowledge of what different zones look like, let's put it into practice. Recently I photographed Spruce Flats Falls in Great Smoky Mountains National Park. It's a waterfall that I've photographed before, but I had a bit of tripod shake resulting a a blurry image when printed large. Since I already knew exactly what my composition would be, I had a lot of spare time to film a video tutorial. In addition, I feel that this particular scene is really an easy example to demonstrate the Zone System.
Whenever I approach a scene like this one, I'm always on the lookout for the brightest and darkest parts of the scene. In this case, the brightest area was the white water at the top of Spruce Flats Falls. In addition to being intrinsically bright (it is WHITE water after all), this particular part of the falls was receiving the most light.
Once I've identified the brightest highlight that I think is important in the image, I start metering. With practice, I've become pretty adept at identifying the brightest part of a scene. However, if I'm in doubt (if there are multiple areas of bright white water for example), I'll use my meter to spot check these areas to confirm the brightest section. Once the brightest area (where detail in the image is required) has been identified, I use my spot meter to take a reading off of this area. I then store this reading in my meter's memory.
This reading, however, will NOT be my exposure time. Remember, our meters are calibrated to give use a middle gray, or Zone V, value. In this case, I don't want the white water in my scene to appear gray. Instead, I want to PLACE this value in Zone VIII. I selected Zone VIII because it is the brightest value that will still retain adequate amounts of detail. (Due to relative dark light in this particular scene, my extended shutter speed removed virtually all detail in the water. However, I still make it a practice to use Zone VIII for white water.) So, how do I place a value in Zone VIII? Recall that there is a one stop difference between each zone. That means that there are three stops between what I metered (Zone V) and where I want to place the value in Zone VIII. Therefore, if I overexpose the reading in my meter by three stops, that value will now be in Zone VIII.
I accomplish that by using the Reciprocity Timer App on my iPhone. This app is as indispensable to me as my tripod. I could not shoot without it. (For a review of this app and others that I use in large format, check out my YouTube video review here.) In the app, I first enter my film stock...in this case Ilford Delta 100. Then, I enter the reading from my Sekonic light meter...in this case 0.5s. In order to place this value in the correct zone, I need to overexpose it by 3 stops. Therefore, I move down to the compensation slider and add in three stops of compensation. The app automatically calculates the reciprocity failure resulting in a shutter speed of 8 seconds. This means if I expose my film for 8 seconds, that white water that I initially metered will now be in Zone VIII...exactly where we want it.
View fullsize
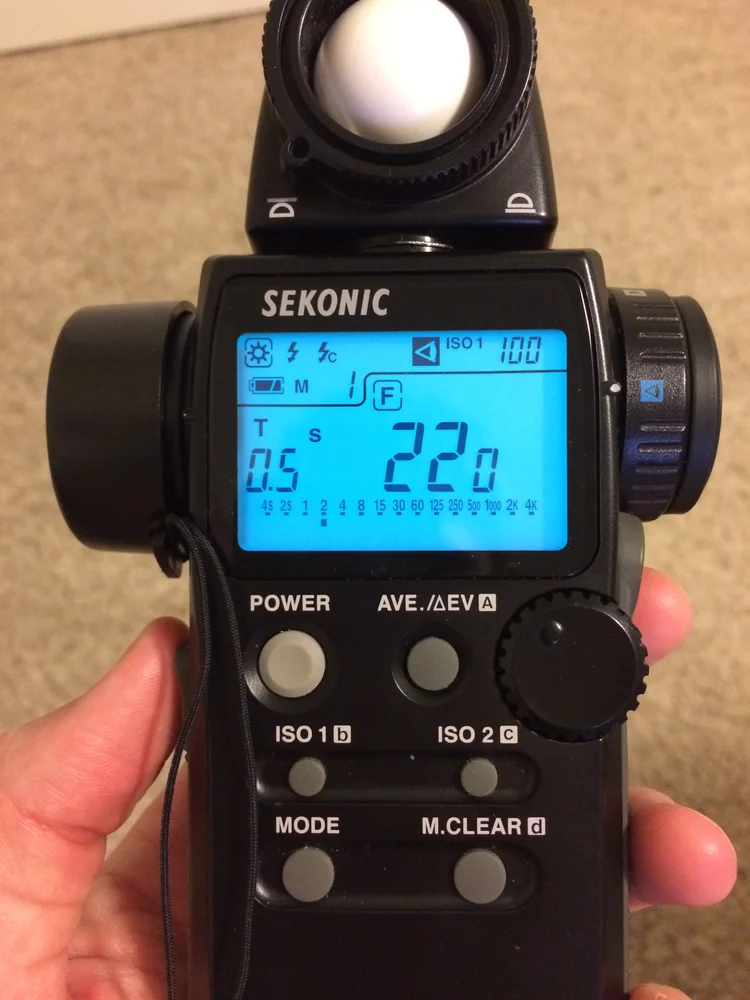
Metering off the top of the waterfall gave me 0.5s. If I exposed for this time, my water would be a Zone V Middle gray shade. Not ideal.
View fullsize
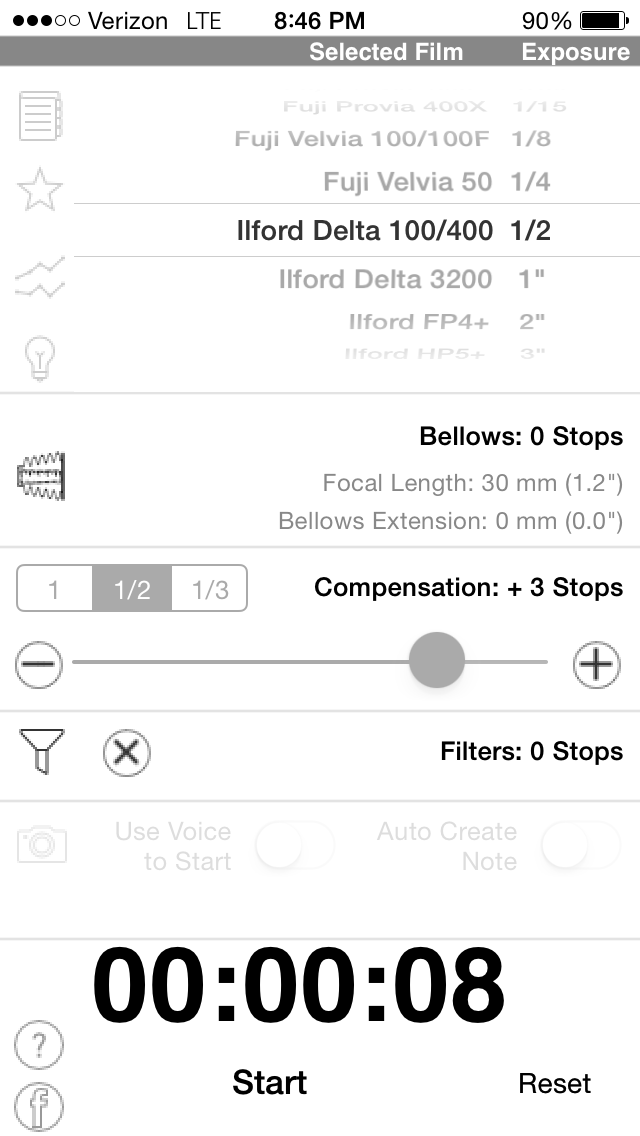
Therefore, I input this number into the Reciprocity Timer App and add 3 stops of exposure compensation. This now places my white water in Zone VIII. With reciprocity failure factored in, my new exposure time is 8 seconds. This means my white water will actually be white now.
Now, I realize that my light meter has this function. In the Sekonic L-558, you can program your ISO2 button to show you exposure compensation. However, I much prefer to do this in the Reciprocity Timer app for several reasons. First, the app lets you input various exposure factors (exposure compensation, filter factors, bellows extension, etc) separately. This means that I'm not having to do any mental math adding those together and inputing them into my light meter. The app keeps things much clearer. Second, the app automatically calculates the reciprocity failure once I've input everything. Again, one less thing for me to calculate.
View fullsize
Use the AVE./^EV button to see where the other values in your scene "fall."
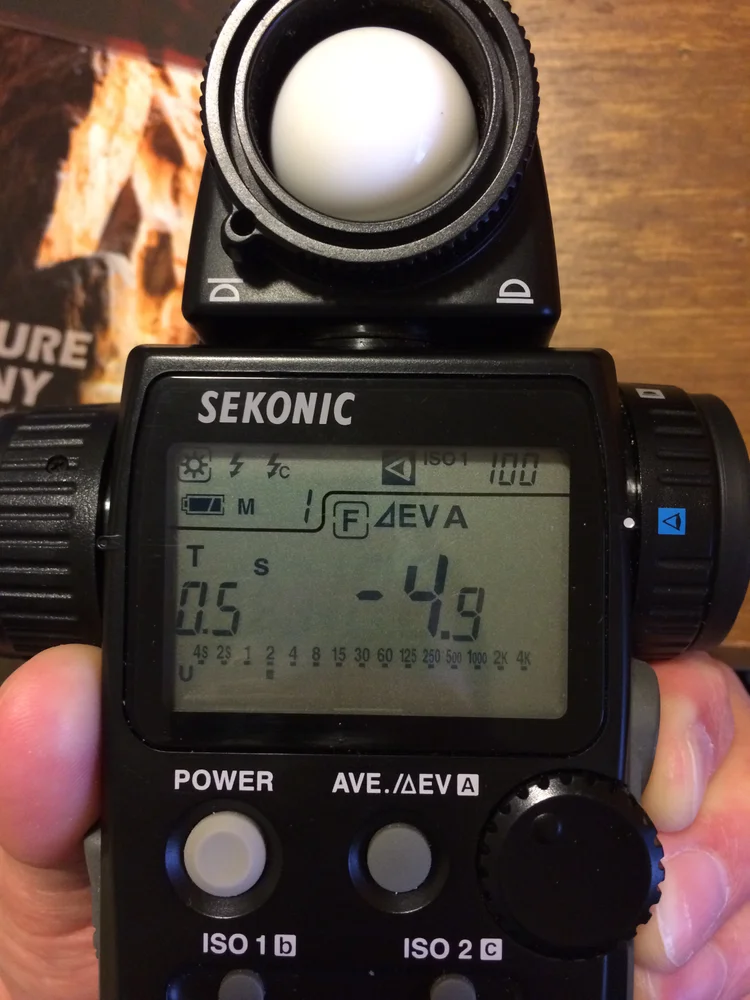
So now that I've used Reciprocity Timer to place my highlights in Zone VIII, I'm almost ready to expose my film. However, I first need to check my shadows. This is where the place/fall principle of the Zone System comes in. I have PLACED my highlights in Zone VIII, now I need to see where my shadows FALL. This is just a way to say that I'm going to check and see how much darker the other areas of my composition
are...essentially checking the dynamic range of my scene. I do this by using the AVE./^EV button on my meter. Once this button is pressed, a capital "A" will appear on the screen of your meter. Now, when you aim your meter at the scene and press the measure button, it will tell you how many stops of difference are between the initial, stored reading and what you are currently viewing.
In this particular scene, there is a dark recessed area just to the left of the waterfall. As this is a pretty prominent component in my scene, I want to make sure this is around Zone III. (Remember, this is the darkest zone that still retains adequate details.) When I checked this area on my meter, I got a reading of -4.9...essentially 5 stops darker than the 0.5s reading I had stored in memory. Because I had PLACED the first reading in Zone VIII, this difference of 5 stops (or 5 zones) means that the dark area FALLS into Zone III.
For this scene, that's all I need to do. I exposed a sheet of Ilford Delta 100 for the 8 seconds that my Reciprocity Timer App gave me and came out with a gorgeous negative with details across the entire range of the scene. In all honesty, I was a bit fortunate that this particular scene fell into that Zone III-Zone VIII sweet spot. Now, there were certainly a few darker areas in the scene. As shown in the diagrammed image below, a few of the darkest shadows beneath the rocks fell into Zone I. However, these areas are such a minor part of the composition that I am fine with them being essentially black with no details.
View fullsize
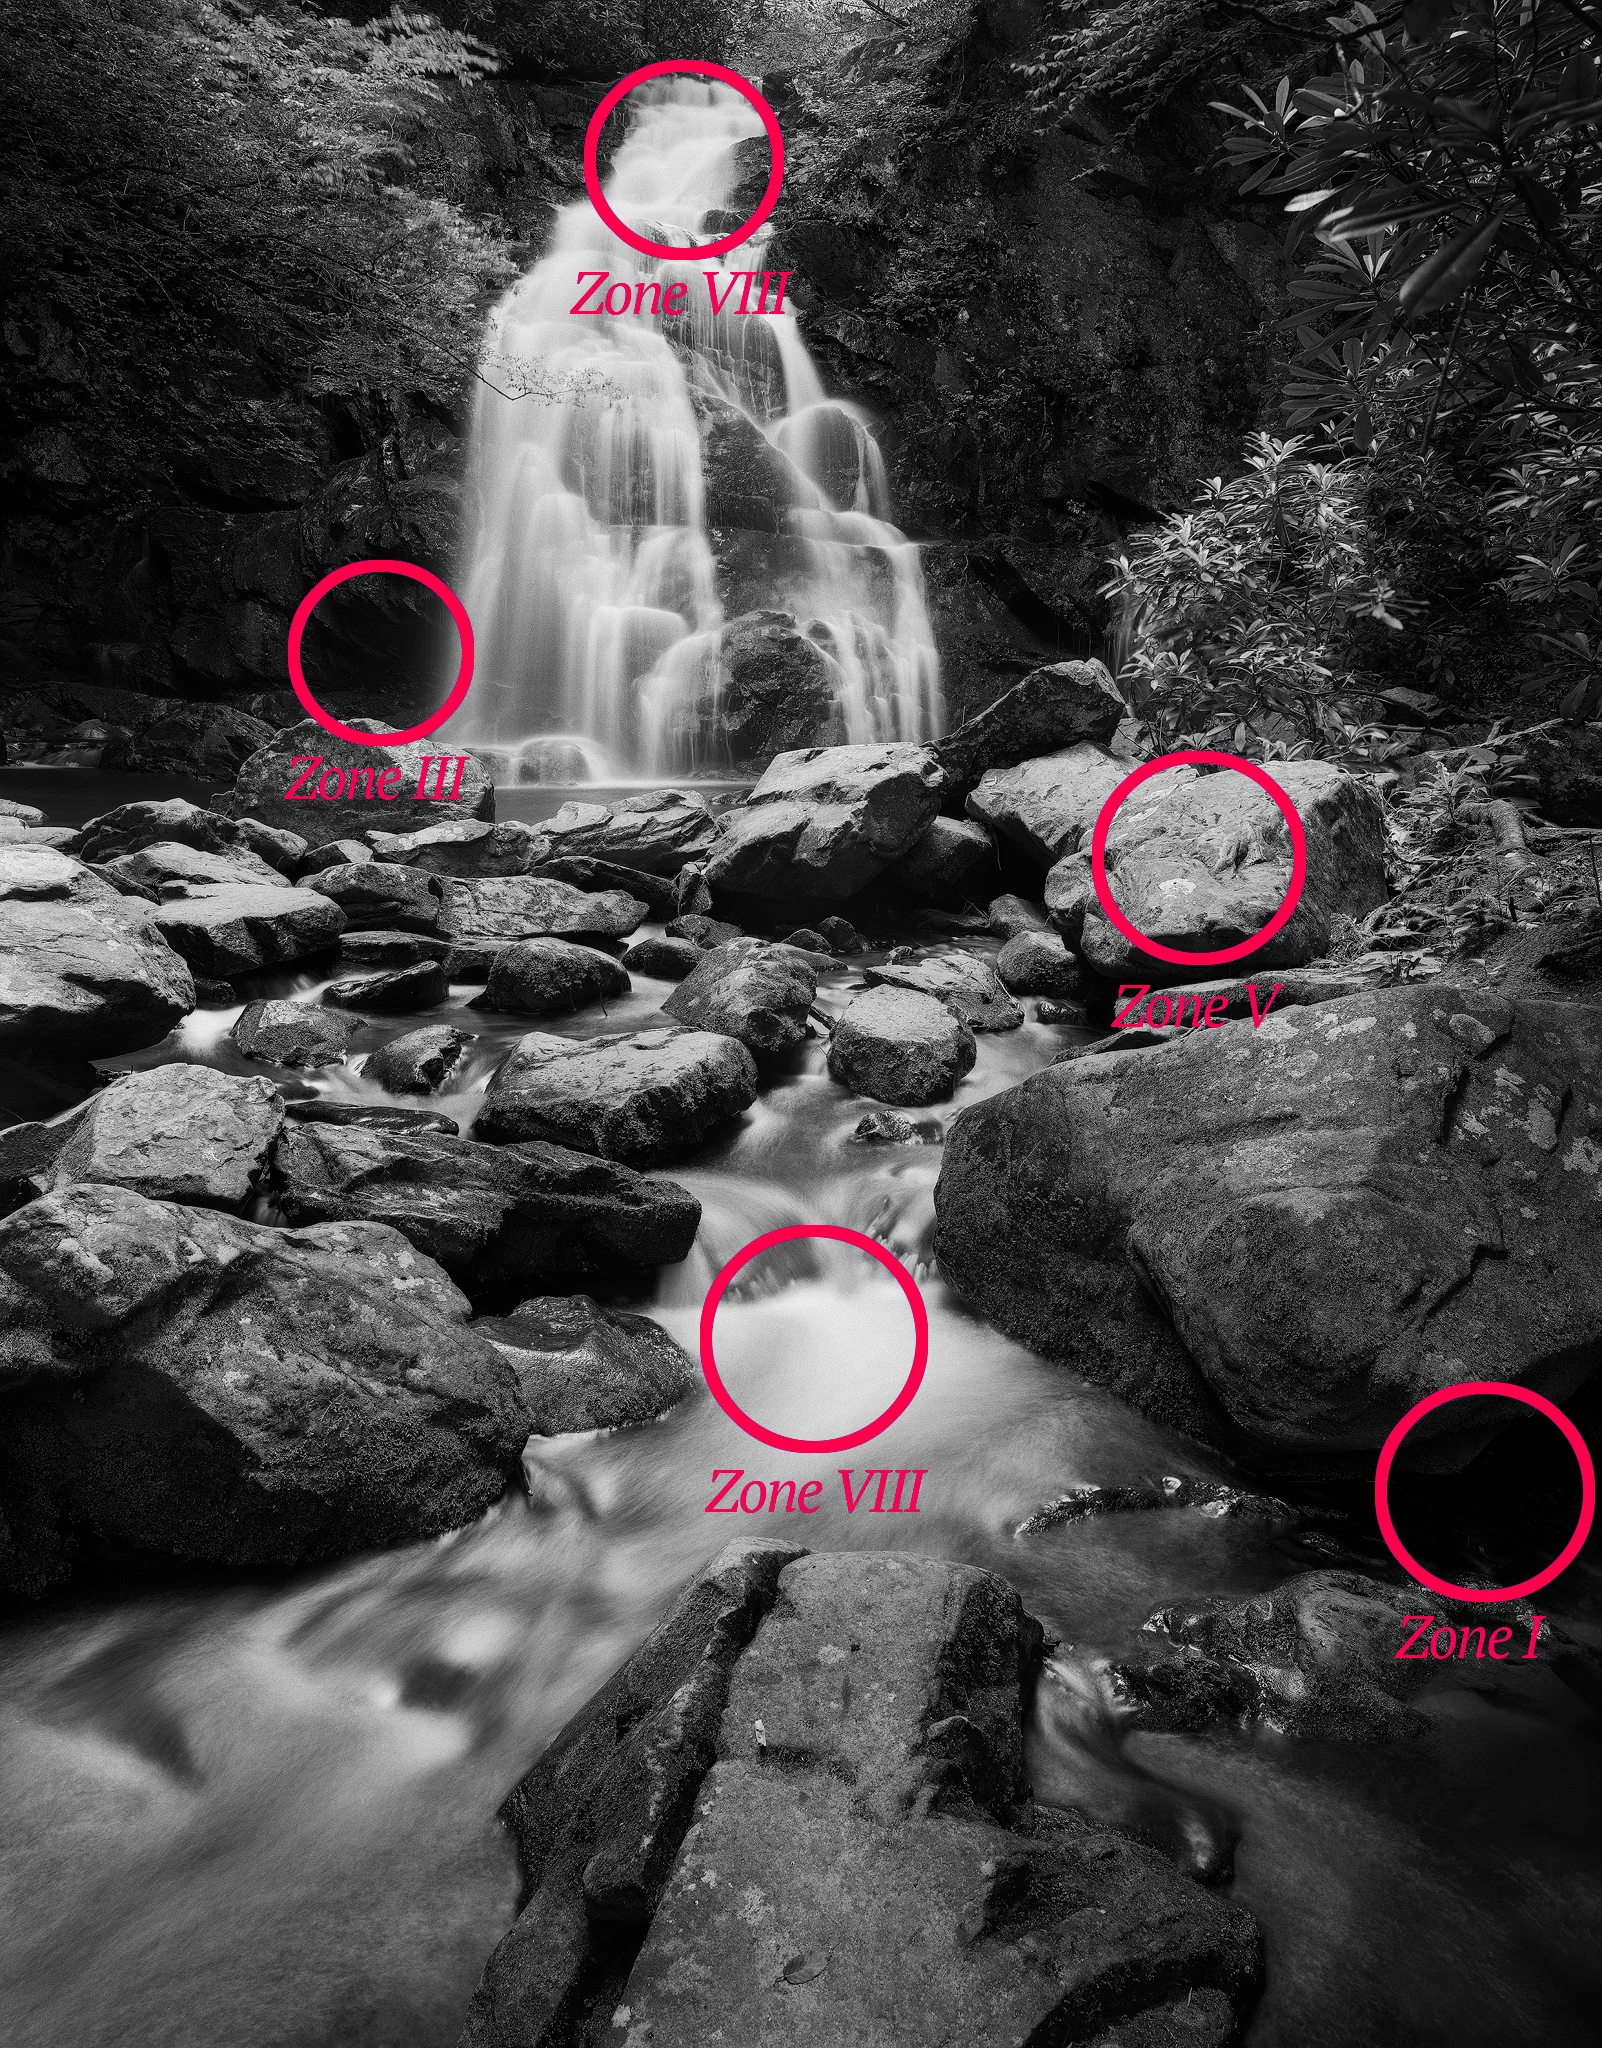
After placing the tones of the white water into Zone VIII, I spot checked the rest of the scene to see what zones these areas fell into.
So what do we do when we come across a scene whose tones aren't quite as perfectly spaced as this one? When I first started this post, I said that Ansel Adams created the Zone System as a way to control both exposure AND development. When the shadows and highlights are not perfectly spaced apart, this is where your developing technique comes in.
When you develop film, the highlights are much more responsive to the developer than the shadow areas. Therefore, as you develop a sheet of film longer, the highlights will continue to get brighter while the shadows will not be affected as much. This principle is how we compensate for scenes where the range between the critical shadows and highlights doesn't fall in III-VIII sweet spot. It's also the basis for the photography saying, "Expose for the shadows and develop for the highlights."
Again in the Spruce Flats Falls example there were 5 stops (zones) of difference between the shadows and highlights. However, let's hypothetically say that there were only 4 stops of difference. Since my shadows are virtually impossible to alter when I develop the film, I need to make sure I get them in the correct zone when I expose. Therefore, I will place them in the critical Zone III to insure there are plenty of details. Because of the 4 stop difference though, this placement means that my highlights are now in Zone VII instead of Zone VIII where I want them. This essentially means that, under normal development, the white water in the falls will be one stop underexposed.
This is where I use developing time to make my highlights brighter while keeping my shadows intact. Because the shadows are not as responsive to additional developing time, simply developing the film longer than normal (at a specific time that I've previously measured and calculated) will make the highlights brighter...essentially extending the dynamic range of my scene. Now, as you can guess from Adam's work, this developing time is exact and will result in a very specific tonality increase; a specific developing time will result in an exact one zone increase. This additional developing time is referred to as N+1 developing (normal plus one), but unfortunately it's not a number I can give you. It is very dependent upon the film type, developer type, and your developing technique. Calculating these numbers (N+1, N+2, etc) are beyond the scope of this blog, but you can read tutorials on how to do it yourself. Alternatively, there are several film shops that will provide this service for you. They will have directions on how to accomplish this.
View fullsize
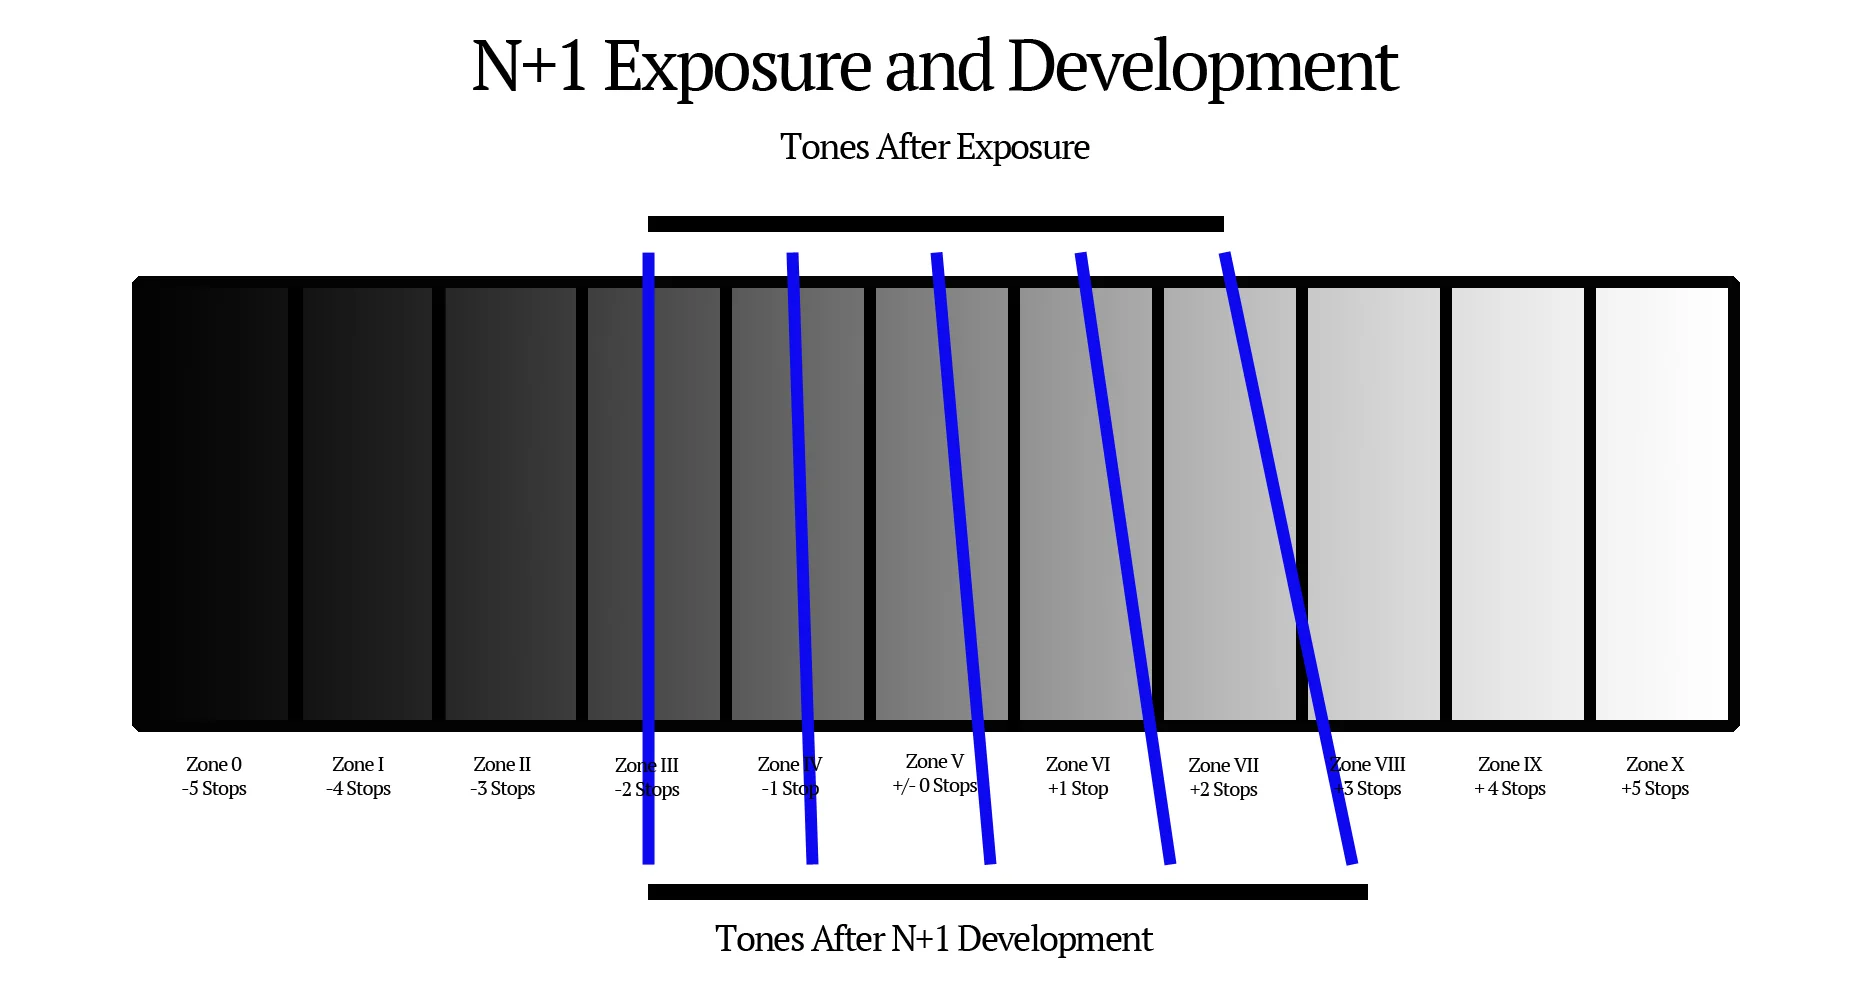
An image showing how the tonality of a scene can be expanded using very specific additional developing time.
I have found that the things I normally shoot usually require N+1 developing. I really love compositions with tons of range between the shadows and highlights. Even though I've never had to use it, you can go the other way with N-1 developing. If you come across a scene with a huge range between the shadows and highlights, you'll again expose for the shadows. In this case you'll actually develop for less time than normal to obtain detail in the highlights. You can see that in order to fully take appreciate the tremendous power of the Zone System, you really need to be developing your own black and white film.
As a final note on black and white film, there is a HUGE difference between N+1 (+2, -1, etc) developing and pushing/pulling film. In both cases you are developing for longer/shorter than normal time, but the application and results are much different. When you push film, you are essentially underexposing an image and trying to get a normal result by over developing the film. However, because your shadows do not respond as well to overdeveloping (they are controlled by the exposure), that initial underexposure means that you've essentially sacrificed your shadows. When you use N+1 (or +2, -1, etc) you are very intentional about retaining detail in the shadows using the correct exposure. The altered developing time is used only to place the highlights in the correct zone.
View fullsize
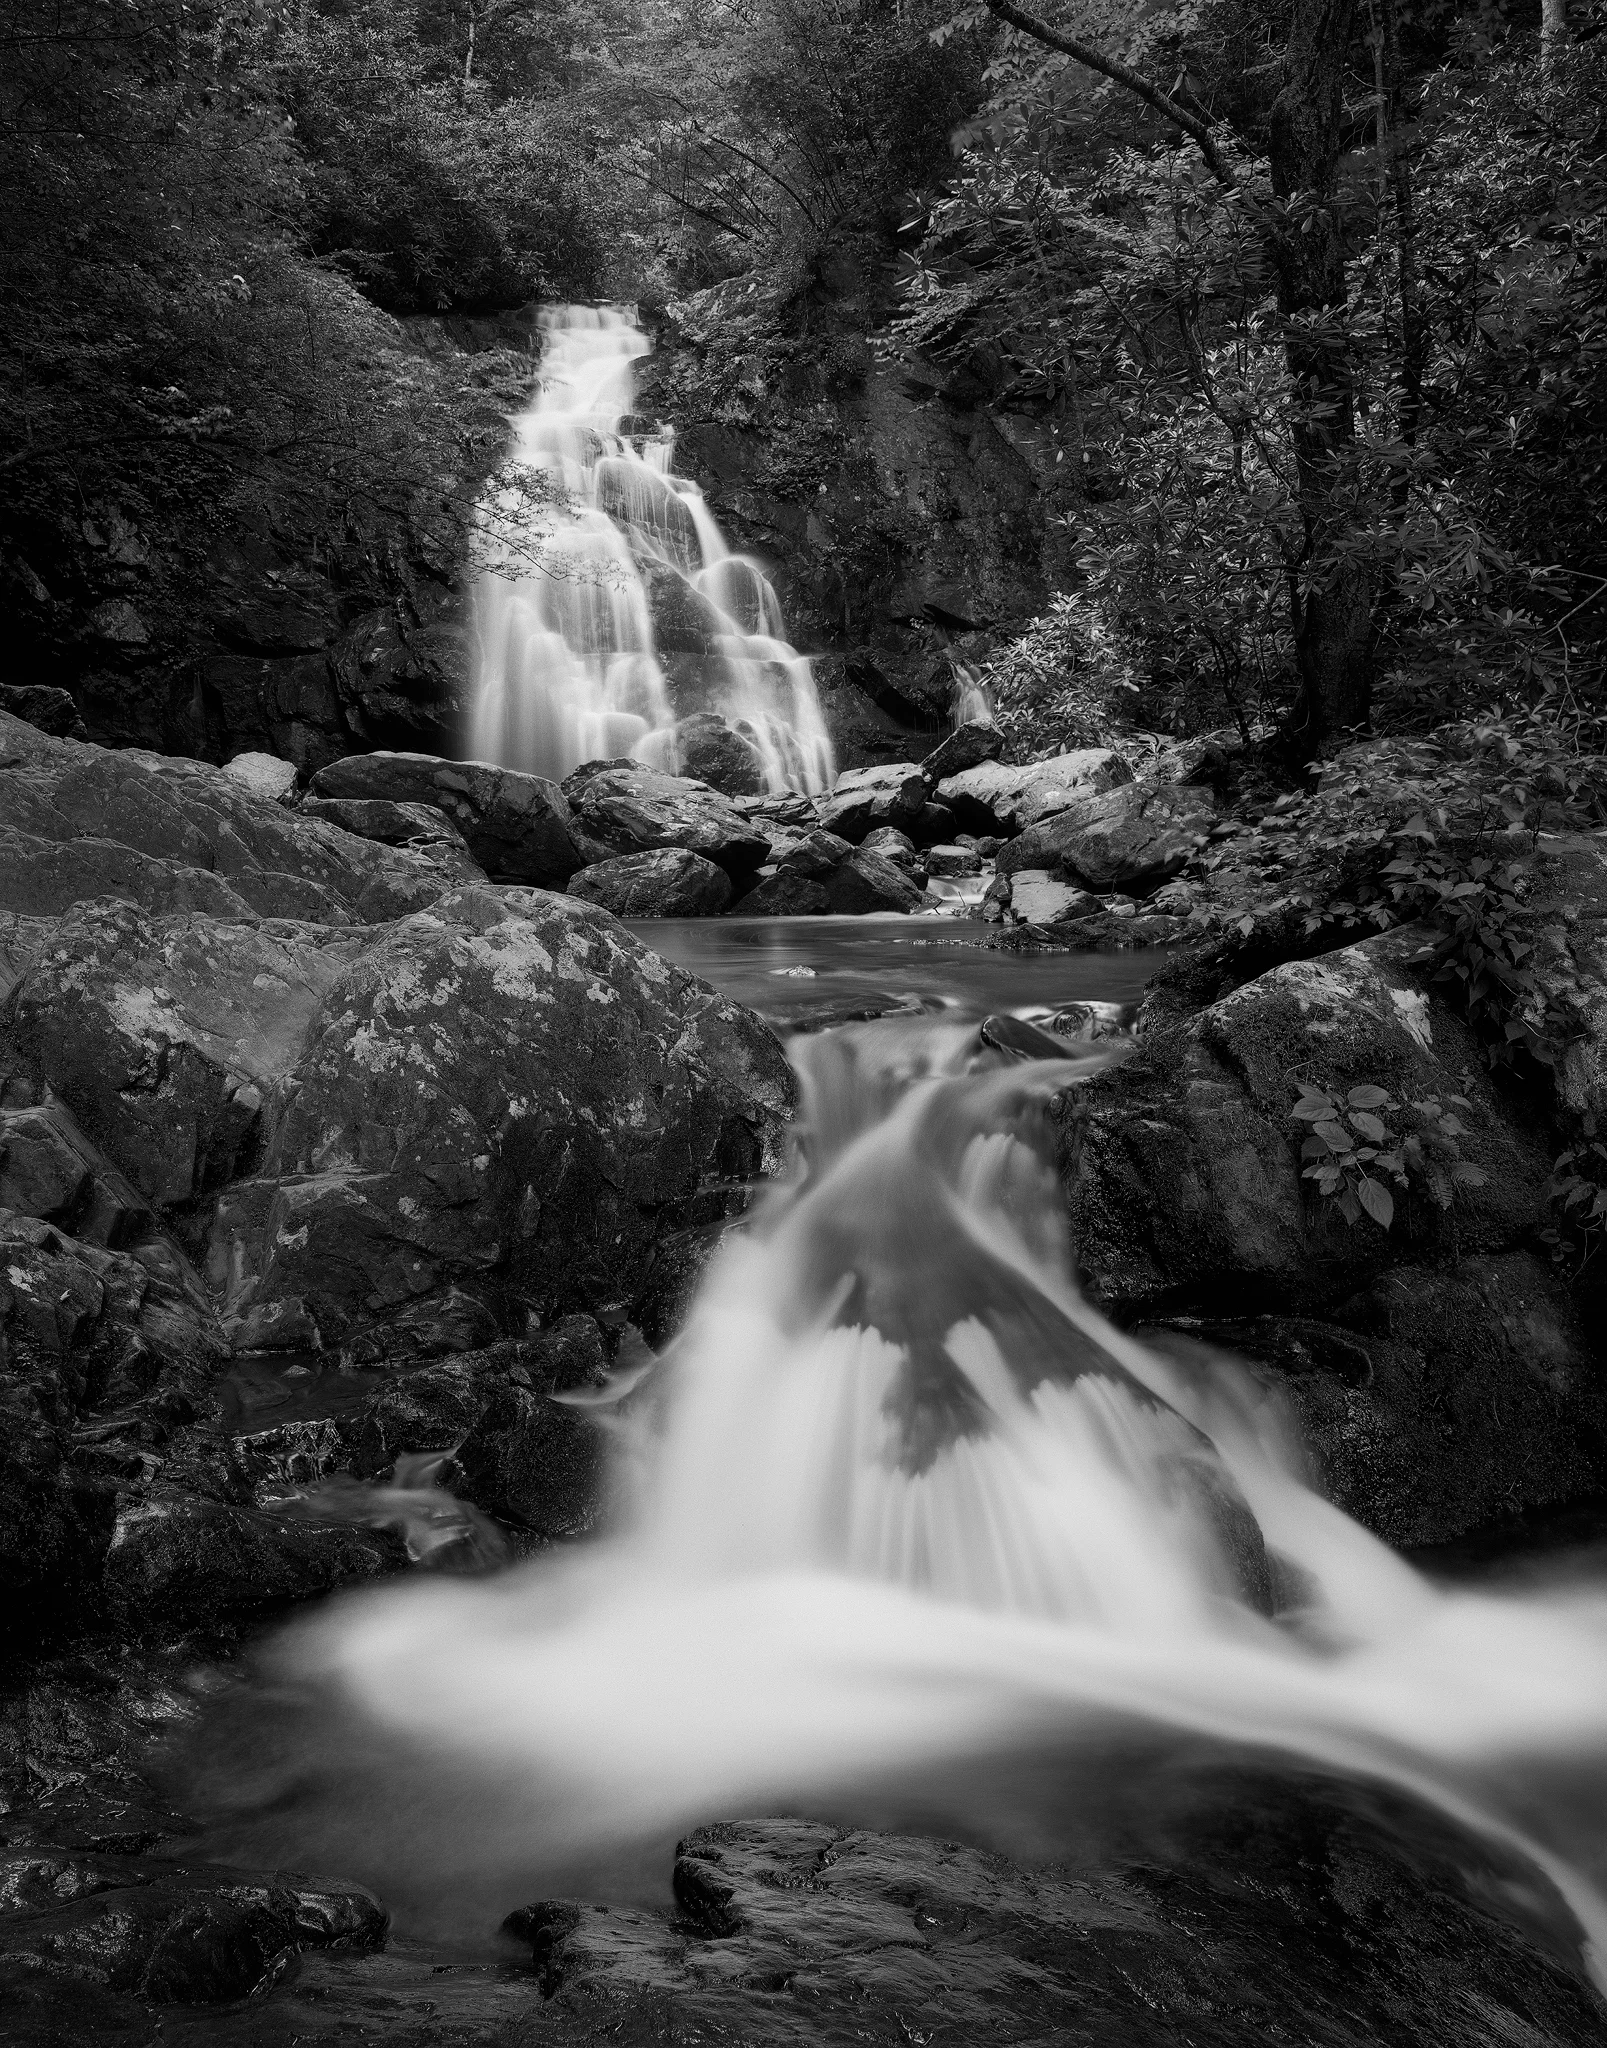
Two compositions in one day! Basically sprayin' and prayin'
Color Negative Film
So, can these principles be applied to color film? Kind of...and it really depends on the type of film you are using. Color film really doesn't have the developing flexibility of black and white film, but I've found that the exposure principles can be applied very successfully. It just depends on the type of film you are using.
View fullsize
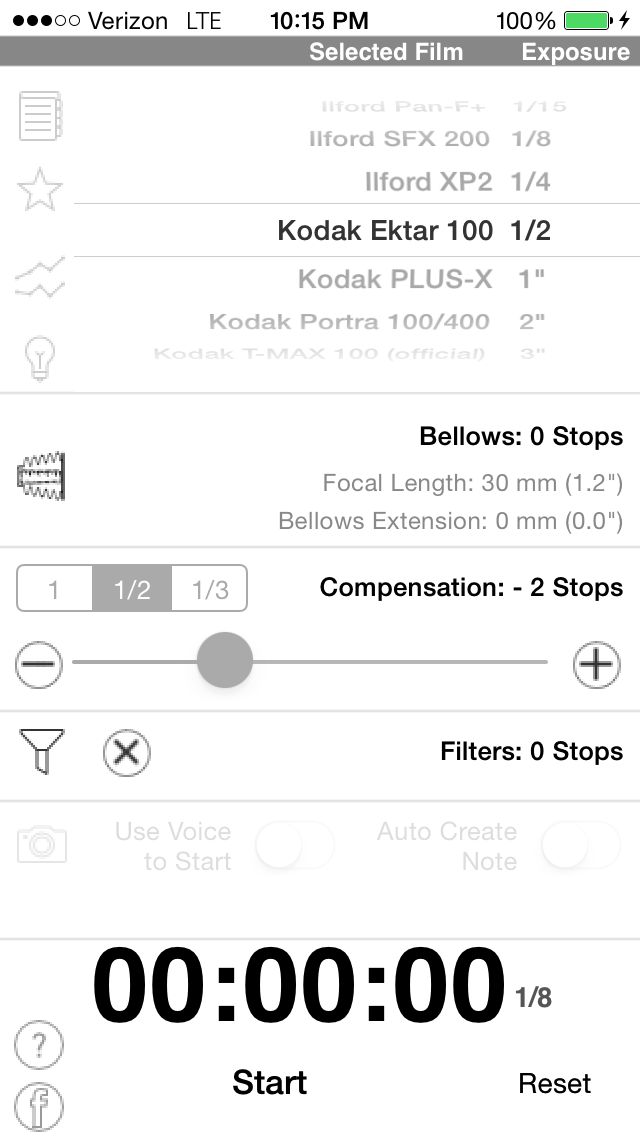
Easy breezy... If my darkest shadow metered at half a second, I place that in the app. Dial in -2 exposure compensation resulting in a 1/8s exposure time.
Let's start with color negative film. In my case I shoot Kodak Ektar 100. You cannot, under any circumstances, overexpose this film; it's impossible! On my trip to Zion last year, I had a sheet of Ektar pop out of my film holder exposing it to direct sunlight. I'm pretty sure if I had it developed it would've still been exposed correctly. In all seriousness, no matter how bright my highlights are, I am never worried about them blowing out with color negative film.
The shadows are a different story though. Underexposed color negative film is an absolute nightmare. Virtually IMPOSSIBLE to scan, it turns into complete mud. Therefore, if I'm planning to shoot Ektar, the only thing I'm concerned about is the darkest shadow in my scene. That's it. The highlights are of no concern. Again using my spot meter function, I'll check around my composition to find the absolute darkest area. Once I've found that, I'll store that number in my meter's memory. Again using the Reciprocity Timer App, the key figure to remember is -2 (Since color film isn't really the Zone System, I won't use Roman Numerals anymore...just your normal +/- exposure compensation). Color negative film will hold details in the shadows as long as they don't go darker than -2. So I'll input the shutter speed from my meter to the app, dial up -2 on the compensation slider, and shoot whatever the app tells me too. It's that simple.
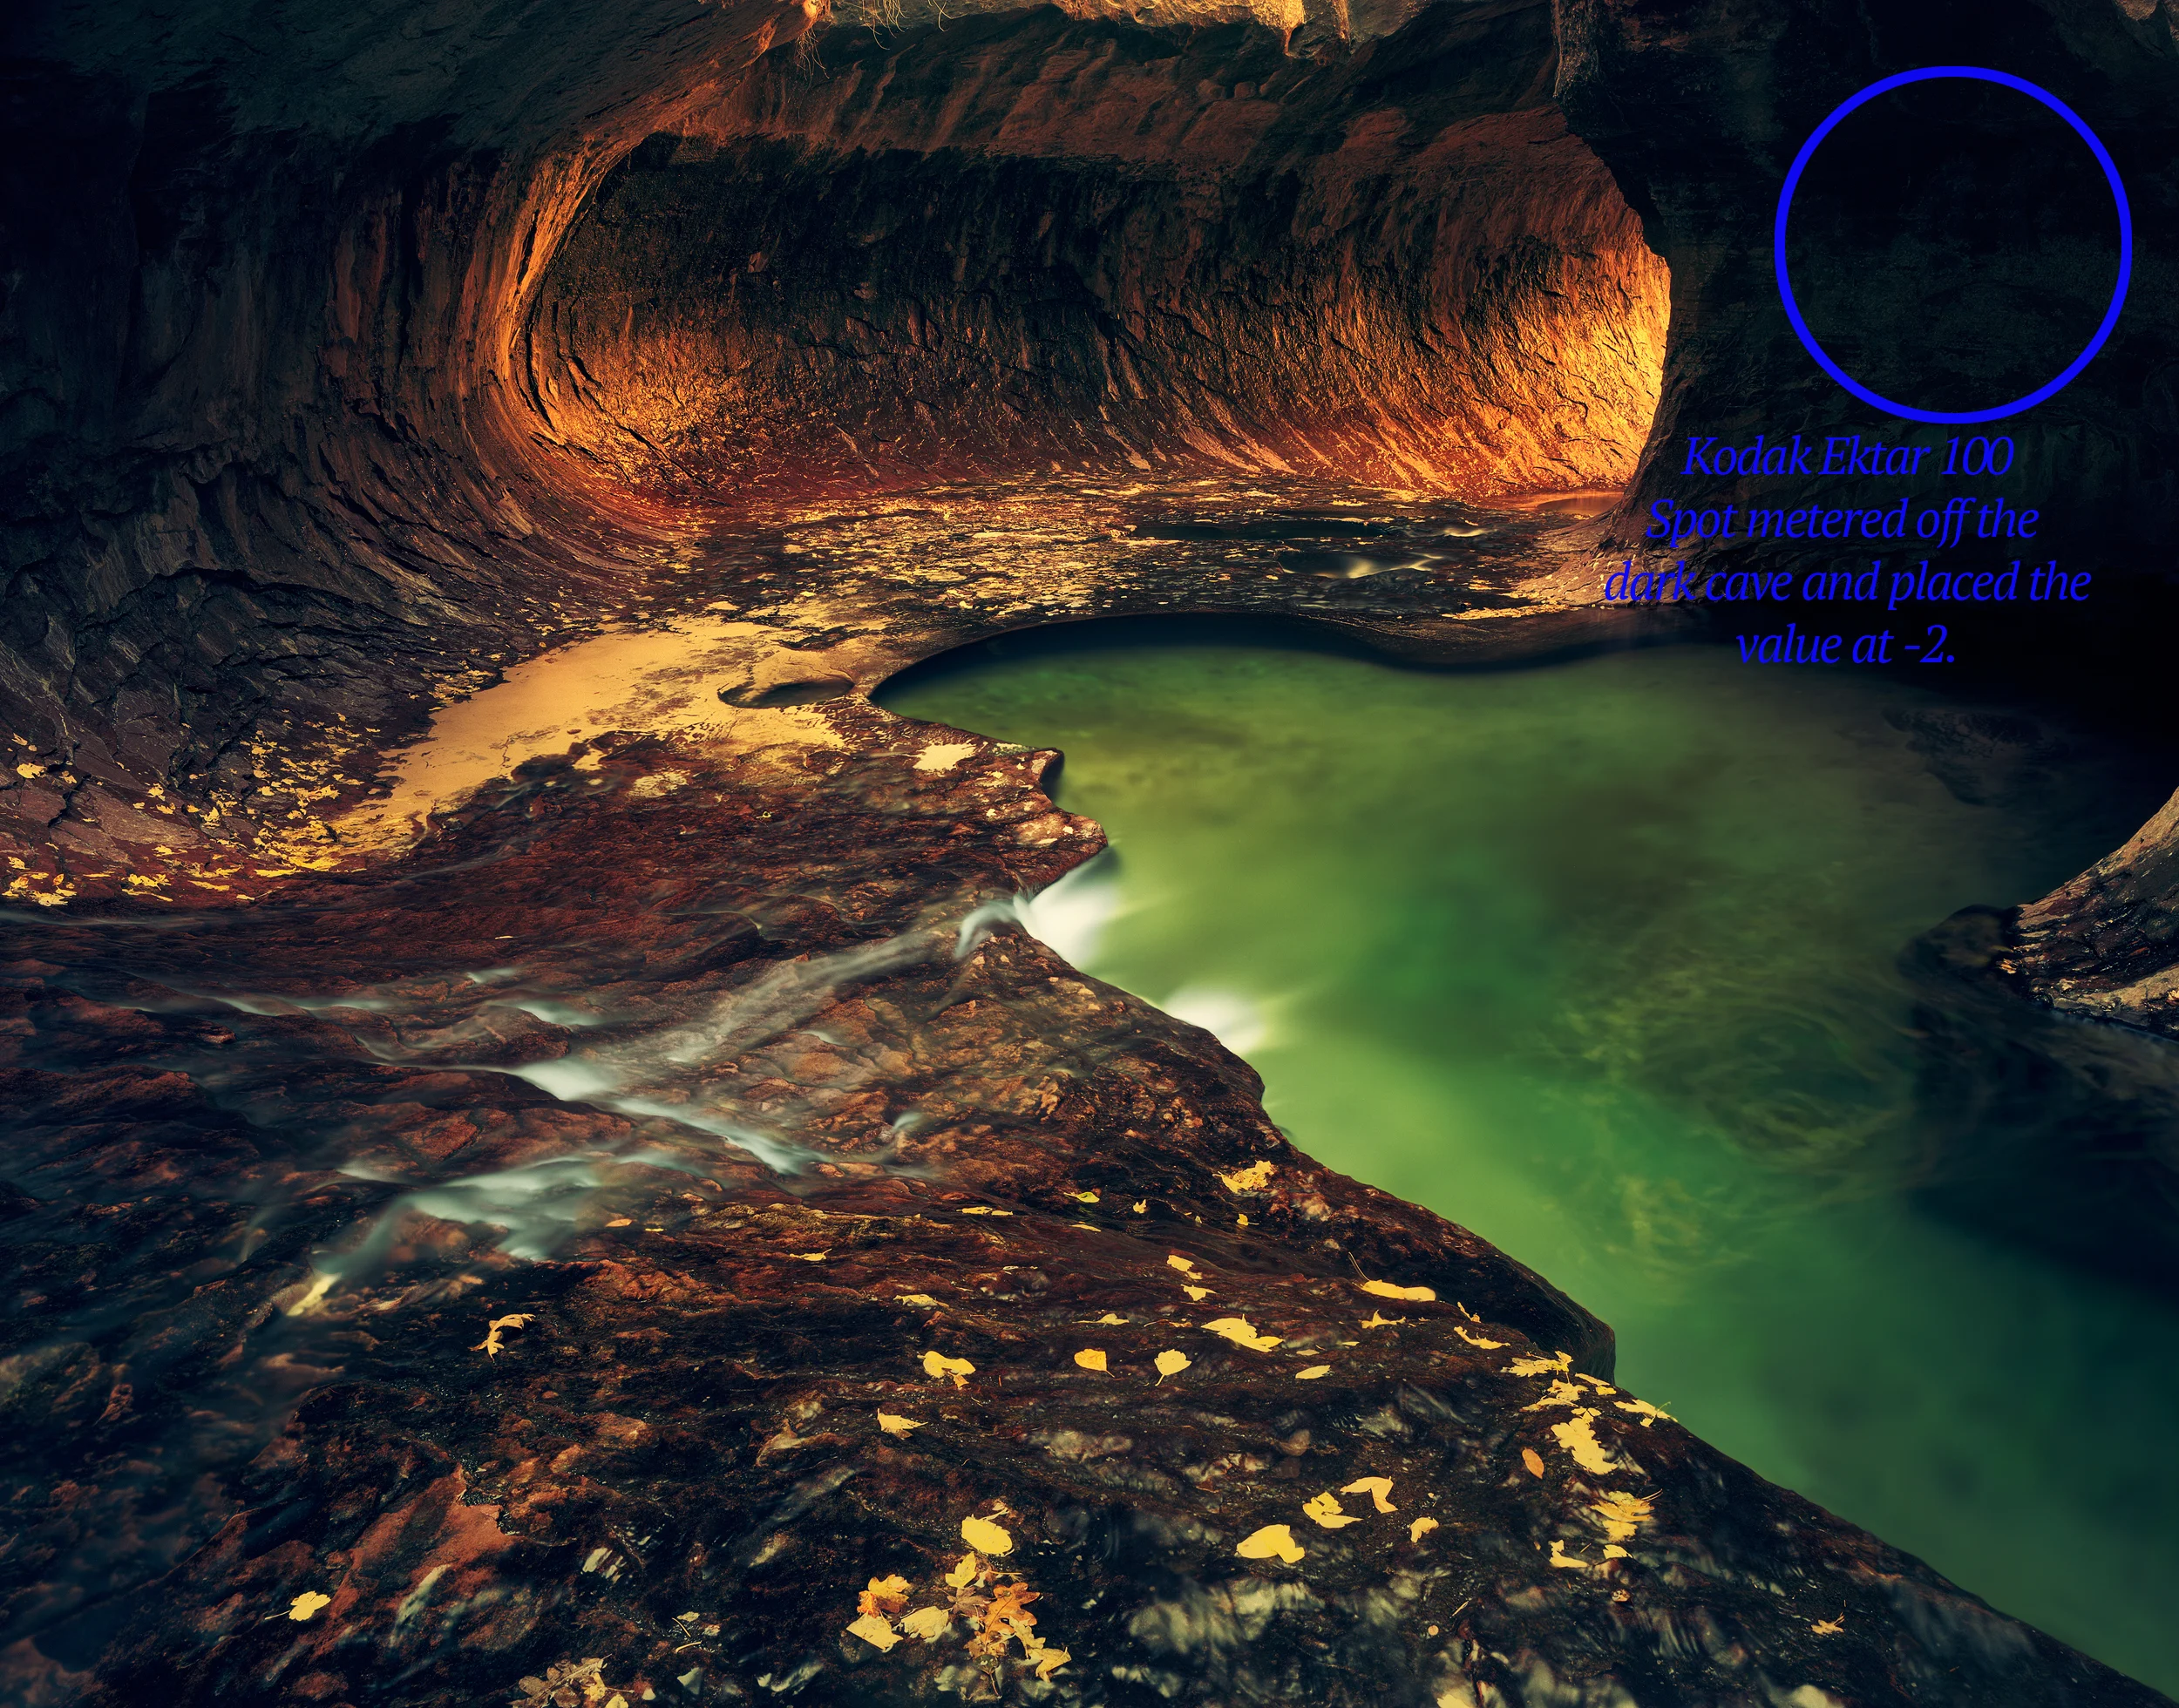
The image below is of Zion's Subway. It's a scene with a huge amount of dynamic range that is perfectly suited for Kodak Ektar. The cave to the right of the emerald pool is REALLY dark (despite any HDR images you may have seen to the contrary...trust me, in real life it's dark.) Because this was the darkest spot in my composition, I used it to meter. I placed that value at -2 and exposed, not caring at all how bright the back wall or the white water was. As you can see, they were perfectly exposed.
View fullsize
Transparency/Slide Film
View fullsize
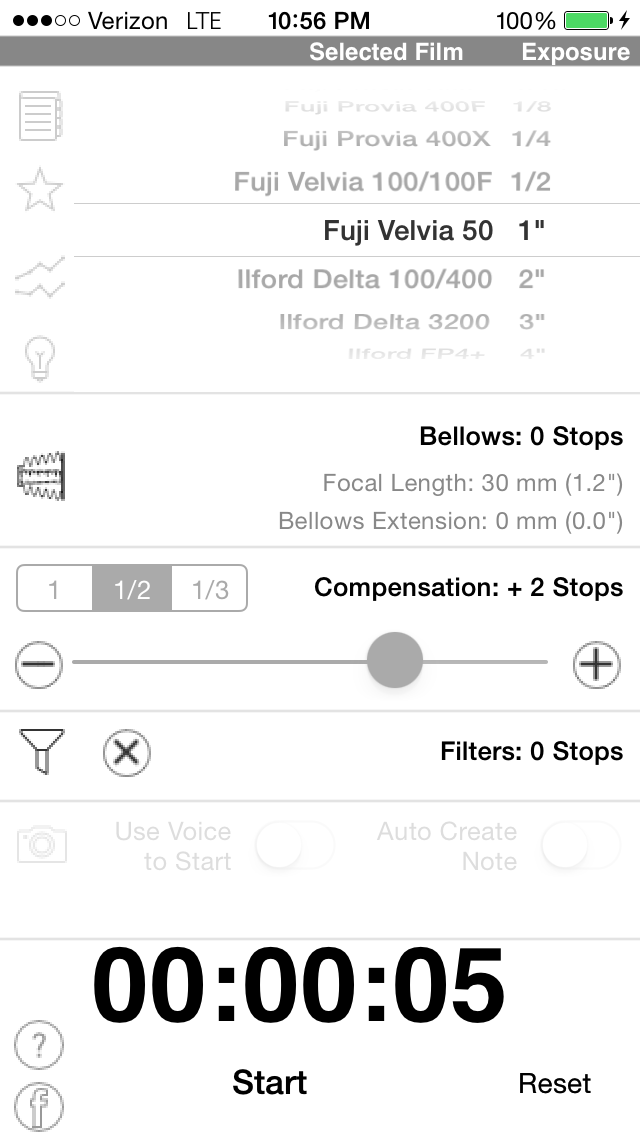
The magic numbers for Velvia 50.
Whereas color neg film has a tremendous amount of latitude, slide film (Ex: Fuji Velvia 50) is extremely narrow. I've seen Ektar hold detail over 10 stops! Velvia 50 on the other hand has 5 stops max. And I'm not talking about the 5 stops that I had discussed earlier with black and white film. If you exceed the critical zone with black and white film, the tones will gently fall off toward either black or white. If you exceed the range of Velvia 50, you'll be staring at distracting black holes or glaring areas of pure white. However, despite its limitations, I (and many others) love it because when the scene is right there is nothing in photography like a correctly exposed sheet of Velvia. A truly magical experience when viewed on the light table!
The important value to remember with Velvia 50 is +2. Your highlights will retain details all the way up to +2. Anything brighter will start to appear blown out...very distracting. OCCASIONALLY, I'll let a highlight go up to +2.5 if and only if it's a small part of my composition that won't be too distracting. I'll then just do the opposite of Ektar. For Velvia 50, I meter off the brightest area in the scene. Then, I'll place the value from my meter into the app, dial up +2 and fire away. I'm a bit more meticulous about spot checking my shadows though to make sure they don't go below the -2.5 to -3 range. If there is no way the scene will fit into that 5-stop total range, I'll simply shoot Ektar.
In the scene below, I metered off the white water and made sure that value didn't go brighter than +2. There was a nice, soft reflected light glow illuminating the scene so the overall contrast wasn't too much. A scene tailor made to Velvia's abilities and it rendered it beautifully.
View fullsize
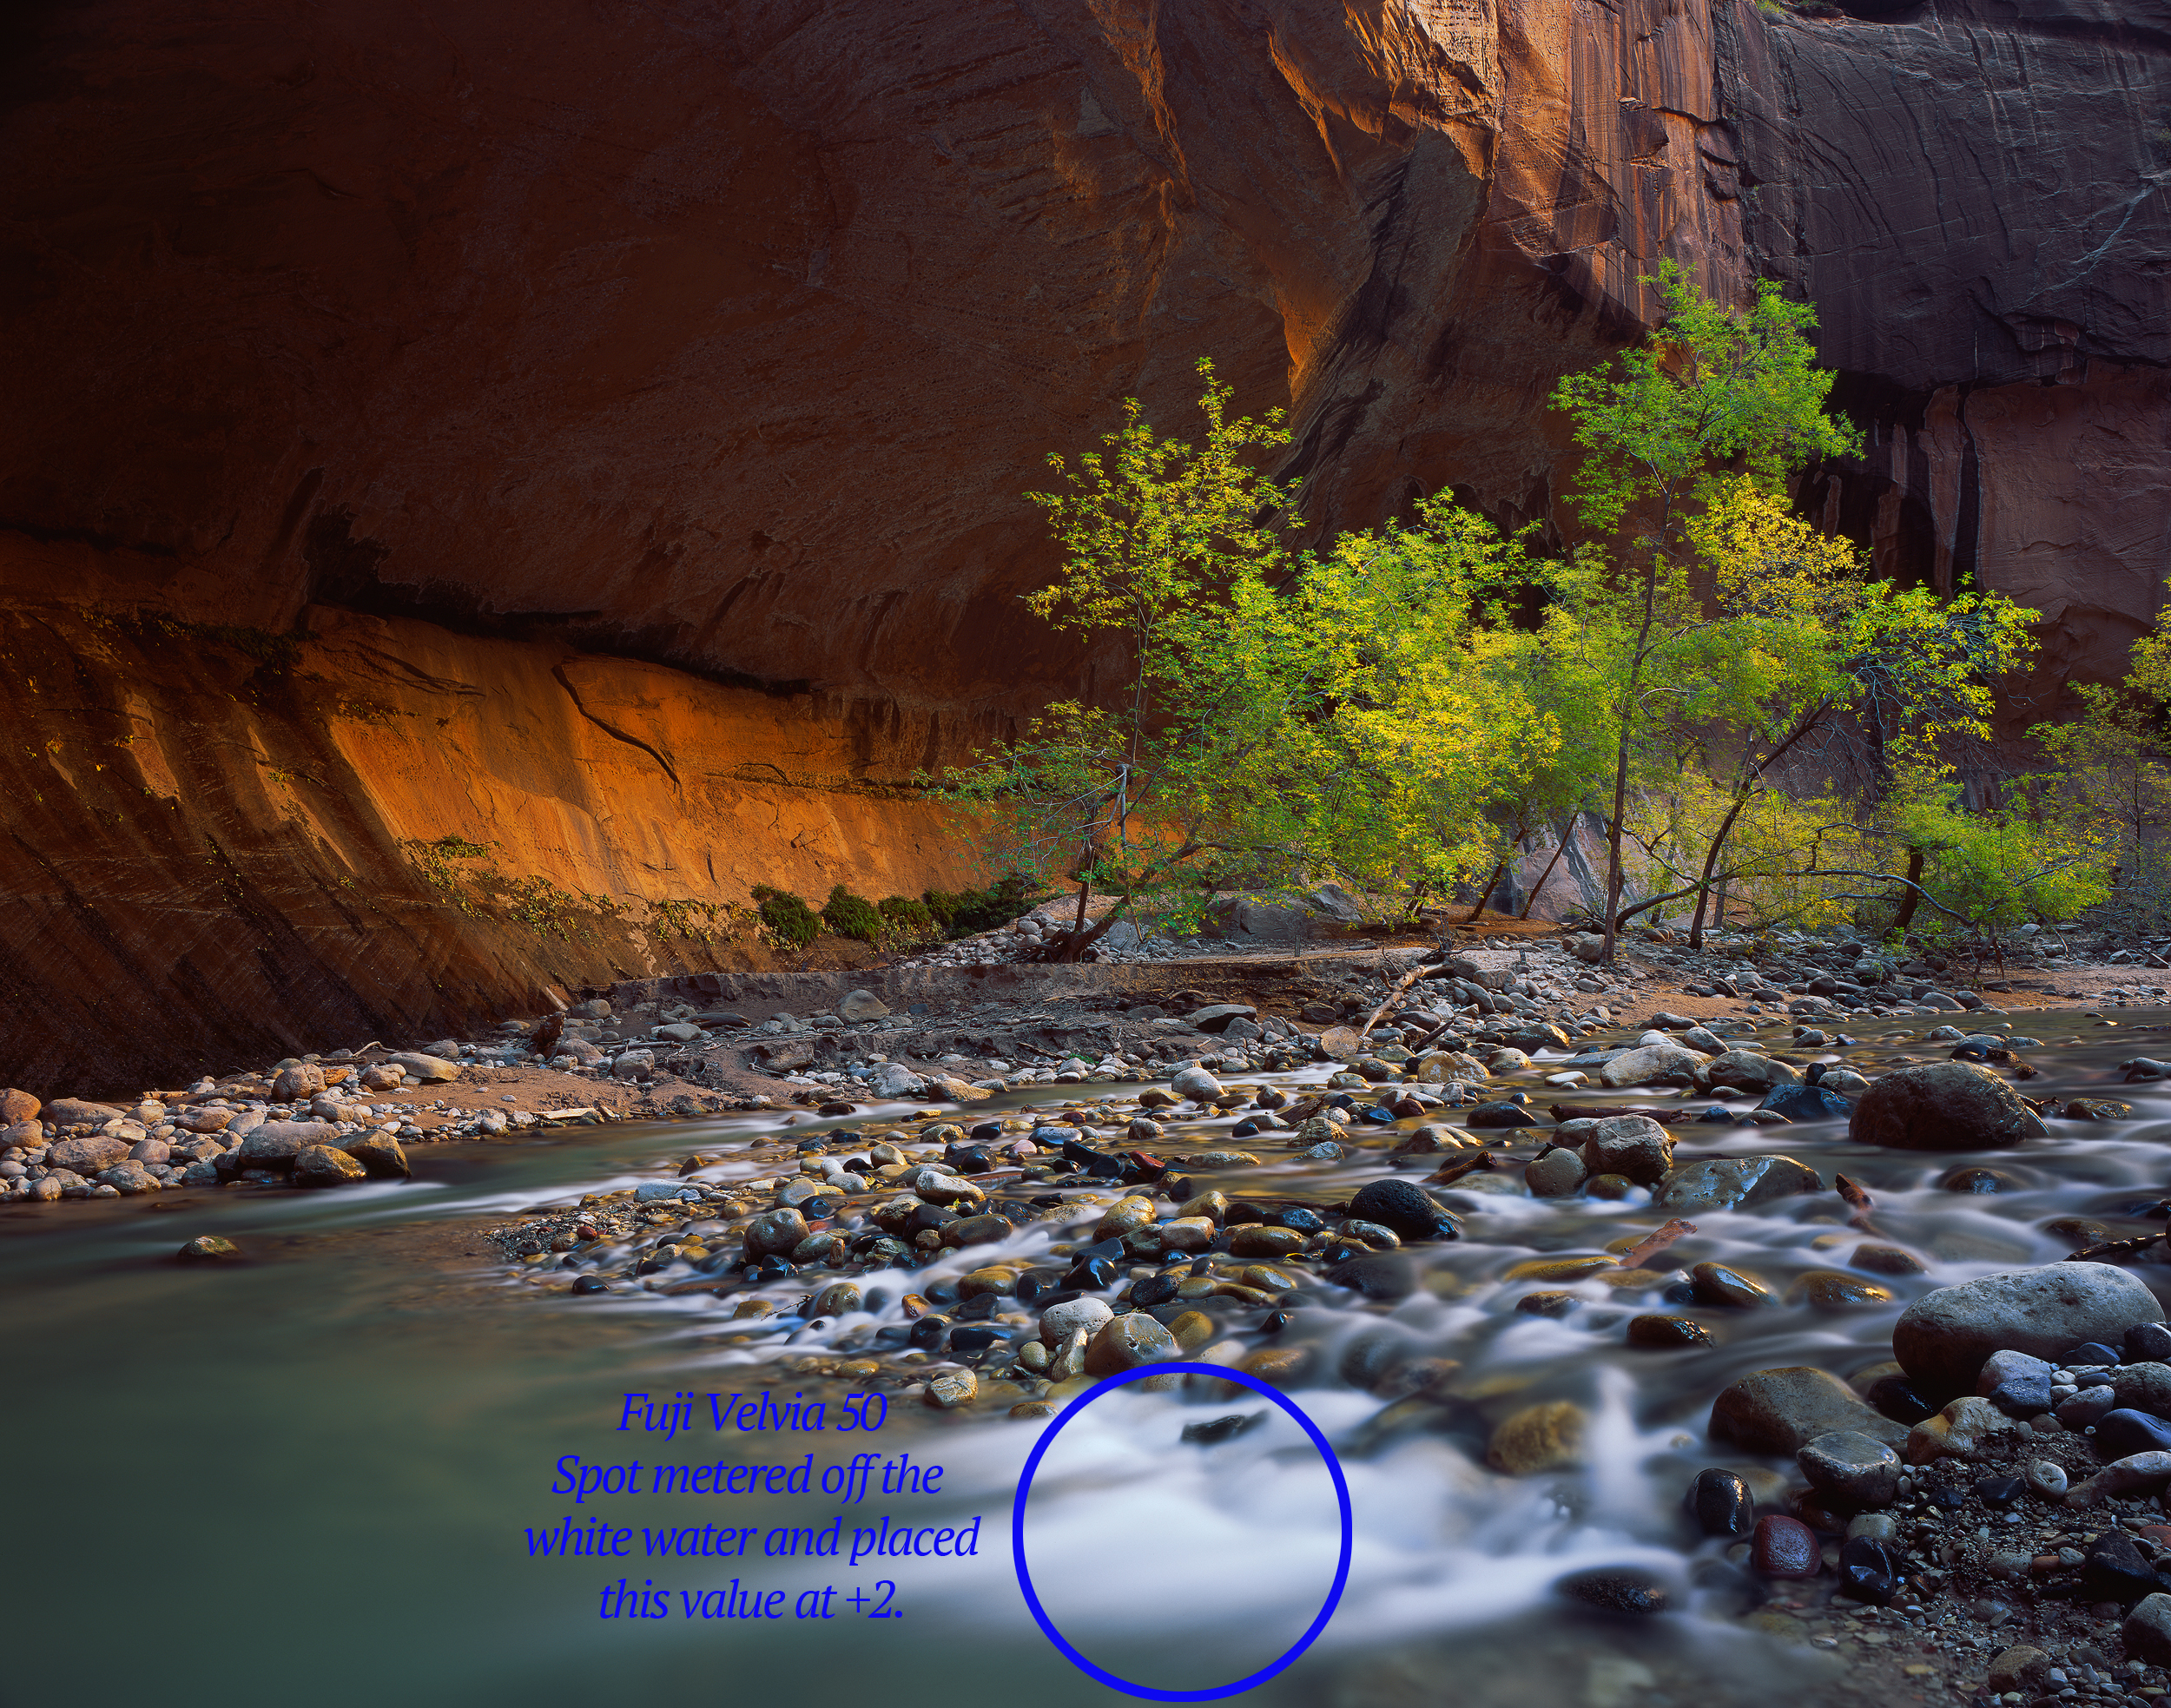
This is why I always have Velvia around.
Closing Thoughts
I know this has been a long post, but I wanted to make sure I covered every single detail. The way I meter is, at least to me, very simple. It's a bit tough to explain I think, but once you get the hang of it, it really works well. I'm honestly pretty laid back when it comes to metering. I'll usually look at a scene, take a single reading, spot check a few areas, and then expose. If I'm shooting Ektar I'll often go beyond what the app tells me to expose by some arbitrary amount of time; a few second, half a minute...just depends on how I'm feeling that day.
I will say this though, my technique does require a bit of pre-visualizing what the final image will look like. This can only come from experience and knowing how my different film stocks respond to different situations.
Click on the green Discuss bar to talk about this article in the forums.


